NDIP - Reduction Plan
In this page, functionality related to the parameters of the Reduction Plan is handled. A reduction plan contains a set of parameters that are necessary to perform data reduction in the later steps/tabs. One ReductionPlan is object is active (in memory) at a time and visible in every tab/step. Every user has their own ReductionPlan object and they can create multiple ones and save them on the disk.
- Overall, users can:
create a Reduction Plan
edit a Reduction Plan
create a new Reduction Plan from the parameters of the one displayed in Edit state
load a Reduction Plan from an exisiting file
Fields
- Below are the fields for creating/editing a Reduction Plan. They are grouped into two categories:
the main fields
the fields that are applicable only for the related instrument
In the latter case, they are only displayed when the associated instrument is selected by the user.
Field |
Type |
Value Origin |
Additional validation |
Mandatory |
|---|---|---|---|---|
Reduction Plan |
String |
filepath usage |
yes |
|
Instrument |
String |
predefined choices from available instrument |
yes |
|
IPTS |
Integer |
valid/existing filepath |
yes |
|
Run Ranges |
Comma-separated numbers and number ranges |
valid/existing filepath |
yes |
|
Wavelength |
Float |
default value from instrument configuration |
positive |
yes |
Grouping |
String |
predefined choices from instrument configuration |
yes |
|
UB Matrix |
String |
valid/existing filepath |
yes |
|
Flux |
String |
valid/existing filepath |
no |
|
Solid Angle |
String |
valid/existing filepath |
no |
|
Mask |
String |
valid/existing filepath |
no |
|
Background |
String |
valid/existing filepath |
no |
|
Reduction Plan file |
String |
valid/non-existing filepath |
yes |
Field |
Type |
Value Origin |
Additional validation |
Mandatory |
Instruments |
|---|---|---|---|---|---|
Detector Callibration |
String |
valid/existing filepath |
no |
SNAP, CORELLI, TOPAZ, MANDI |
|
Tube Callibration |
String |
valid/existing filepath |
no |
CORELLI |
|
Experiment number in IPTS |
Integer |
valid/existing filepath |
yes |
DEMAND |
|
Elastic |
Bool |
default false |
yes |
CORELLI |
|
Offset |
Float |
no |
CORELLI |
||
Wavelength Band |
Float 2 numbers (min, max) |
default values from instrument configuration |
positive, min<max |
yes |
SNAP, CORELLI, TOPAZ, MANDI |
In case detector and tube calibration are both hidden, the whole calibration section can be hidden, too.
Field Interactions
- When the user selects an instrument, besides showing/hidding the above fields, data are retrieved from the instrument’s configuration (example here: Data Dictionary Instrument Configuration):
Wavelength/Wavelength default value
Grouping dropdown choices
Detector, Tube, Flux, Solid Angle, Mask and Background starting folder filepaths for the filebrowser
When the user selects (an instrument and) an experiment (ipts), then the recommended starting path for saving the reduction plan file is at: /<facility>/<instrument>/shared/<ipts>/garnet. The garnet folder needs to be created, if it does not exist.
Note: If the user has not selected an instrument yet, a default option should appear for every fileselect field.
Validation
- The following validations occur before the Reduction Plan creation:
required fields
field types
for files: filepath format, whether the files exist and have the correct extension
the run range files exist in the instrument/experiment filepath.
the IPTS folder exists in the instrument filepath
the reduction plan filepath is unique. In case of a new reduction plan with an exisiting filepath, a warning popup message is displayed to the user to ask whether they want to override the existing one.
Some of them are checked in the backend, while others are checked on the client side (before form submission) to provide an initial check.
- Backend validations can include:
validations through Mantid algorithms
accesing the filesystem, e.g. file exists
reduction plan exceptions
- Client side validation can include:
required fields
field types
filepath format and file extention
run range format
wavelength min < max
All required fields are marked with * on the left and “(required)” on the right marked in red color to their label (name). In case a field becomes invalid, it is marked with a red background border around the field box. A small error message appears below the field, too. Additionally, the associated functionality of the button is deactivated (form is not submitted) until all the fields are valid and the required fields are filled-in.
After the form is submitted, error from backend validation can appear as an error message pop-up.
Lastly, in case of a successfull action, e.g. form submission, success status messages are displayed for n=5ms below the associated button and then they disappear.
Submission
Save button: In order to save the reduction plan, the users click the Save button on the bottom of the form. Following the validation rules, the parameters are gathered and sent to the backend to create/edit the reduction plan.
Save As button: In order to save a copy of the reduction plan parameters in a new file, the users click the Save As button on the bottom of the form. Following the validation rules, the parameters are gathered and sent to the backend to create the reduction plan. An additional (backend) validation rule here, is to check whether the user selects an exisiting (reduction plan) instead of a new one. A warning appears whether they would like to continue or not. The button is visible only in the Edit mode.
Create
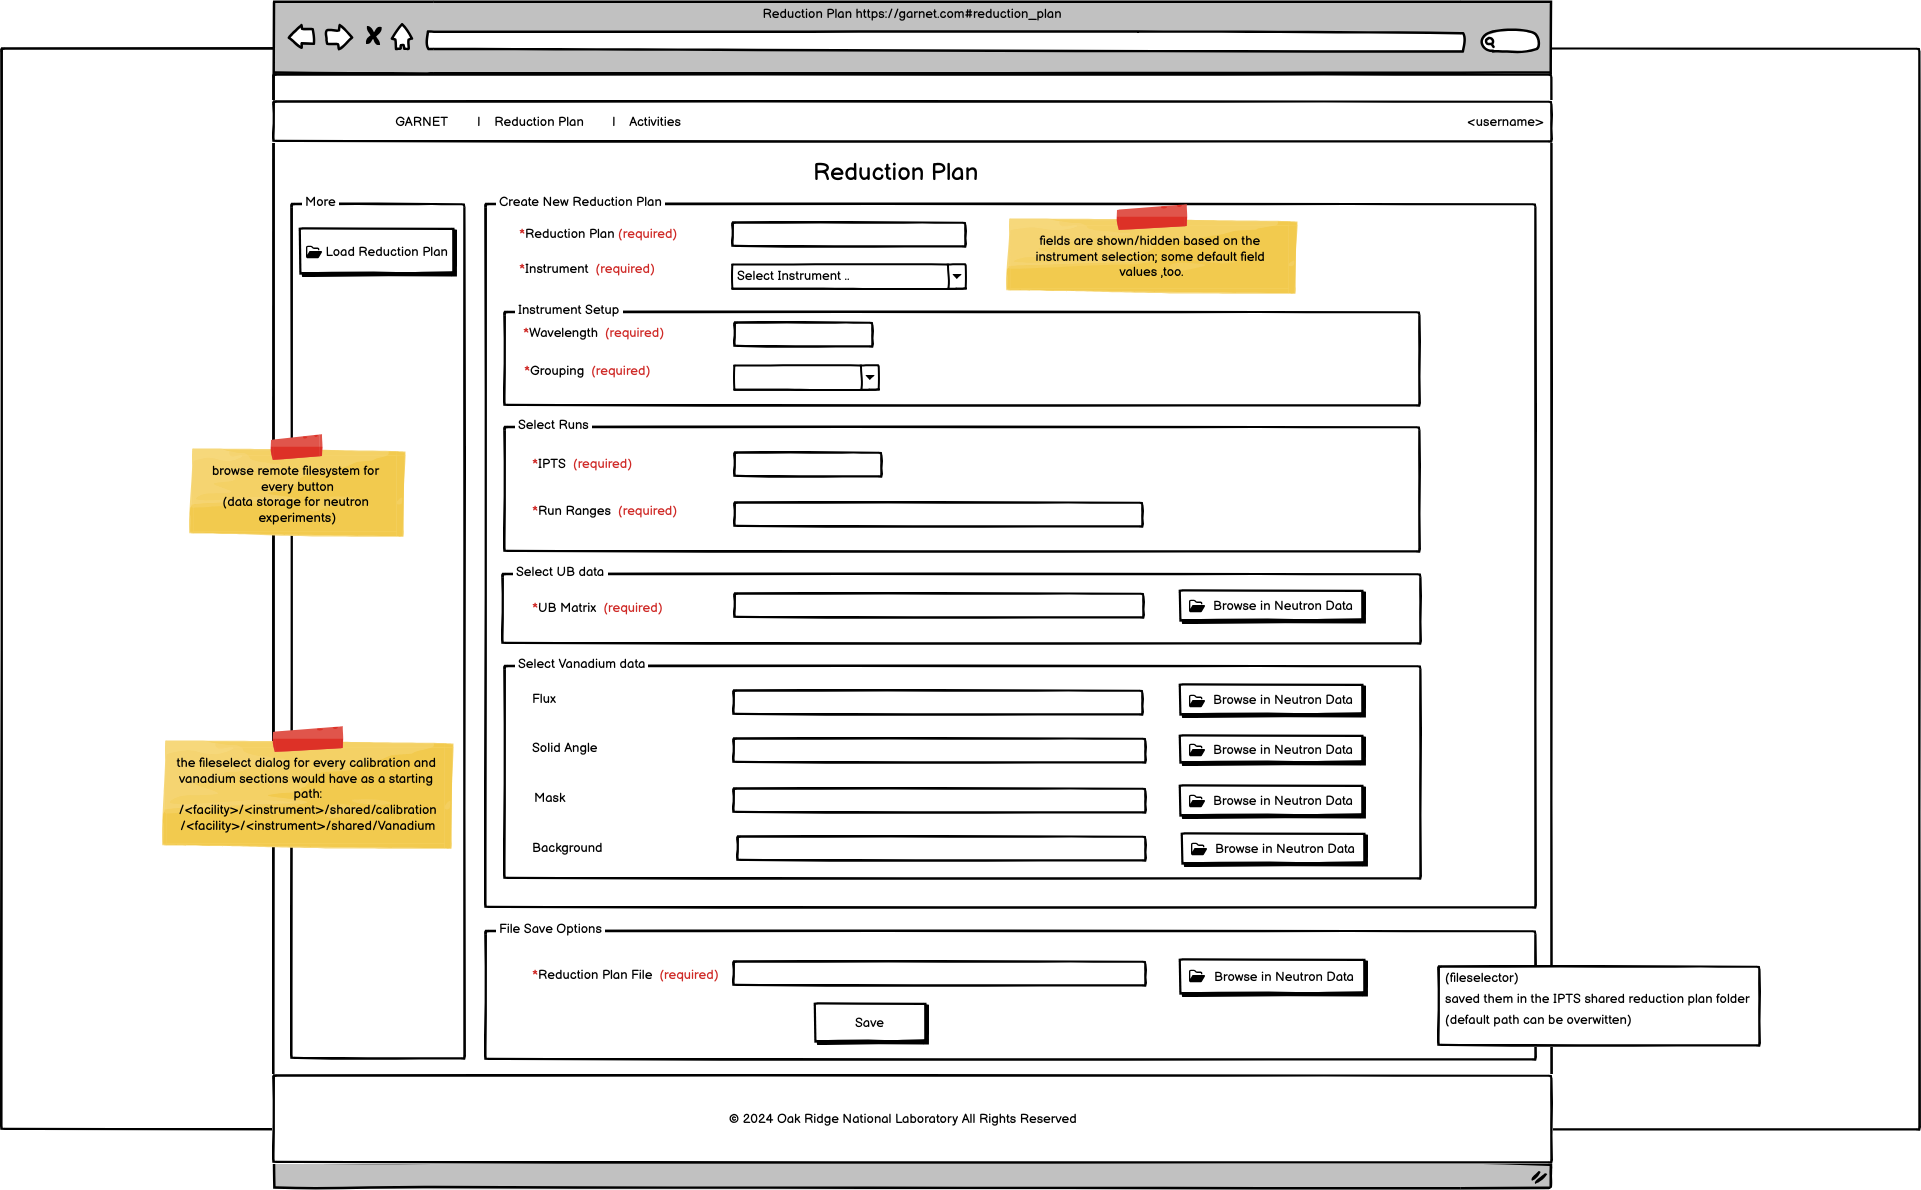
The user can land here from the menu item Reduction Plan–>Create or from the Home Page Create Reduction Plan button. In this case all fields are empty. The associated wireframe is here: Wireframe Reduction Plan Create - Landing.
As the user fills-in the form and selects the instrument other fields appear as shown here: Wireframe Reduction Plan Create - All Fields.
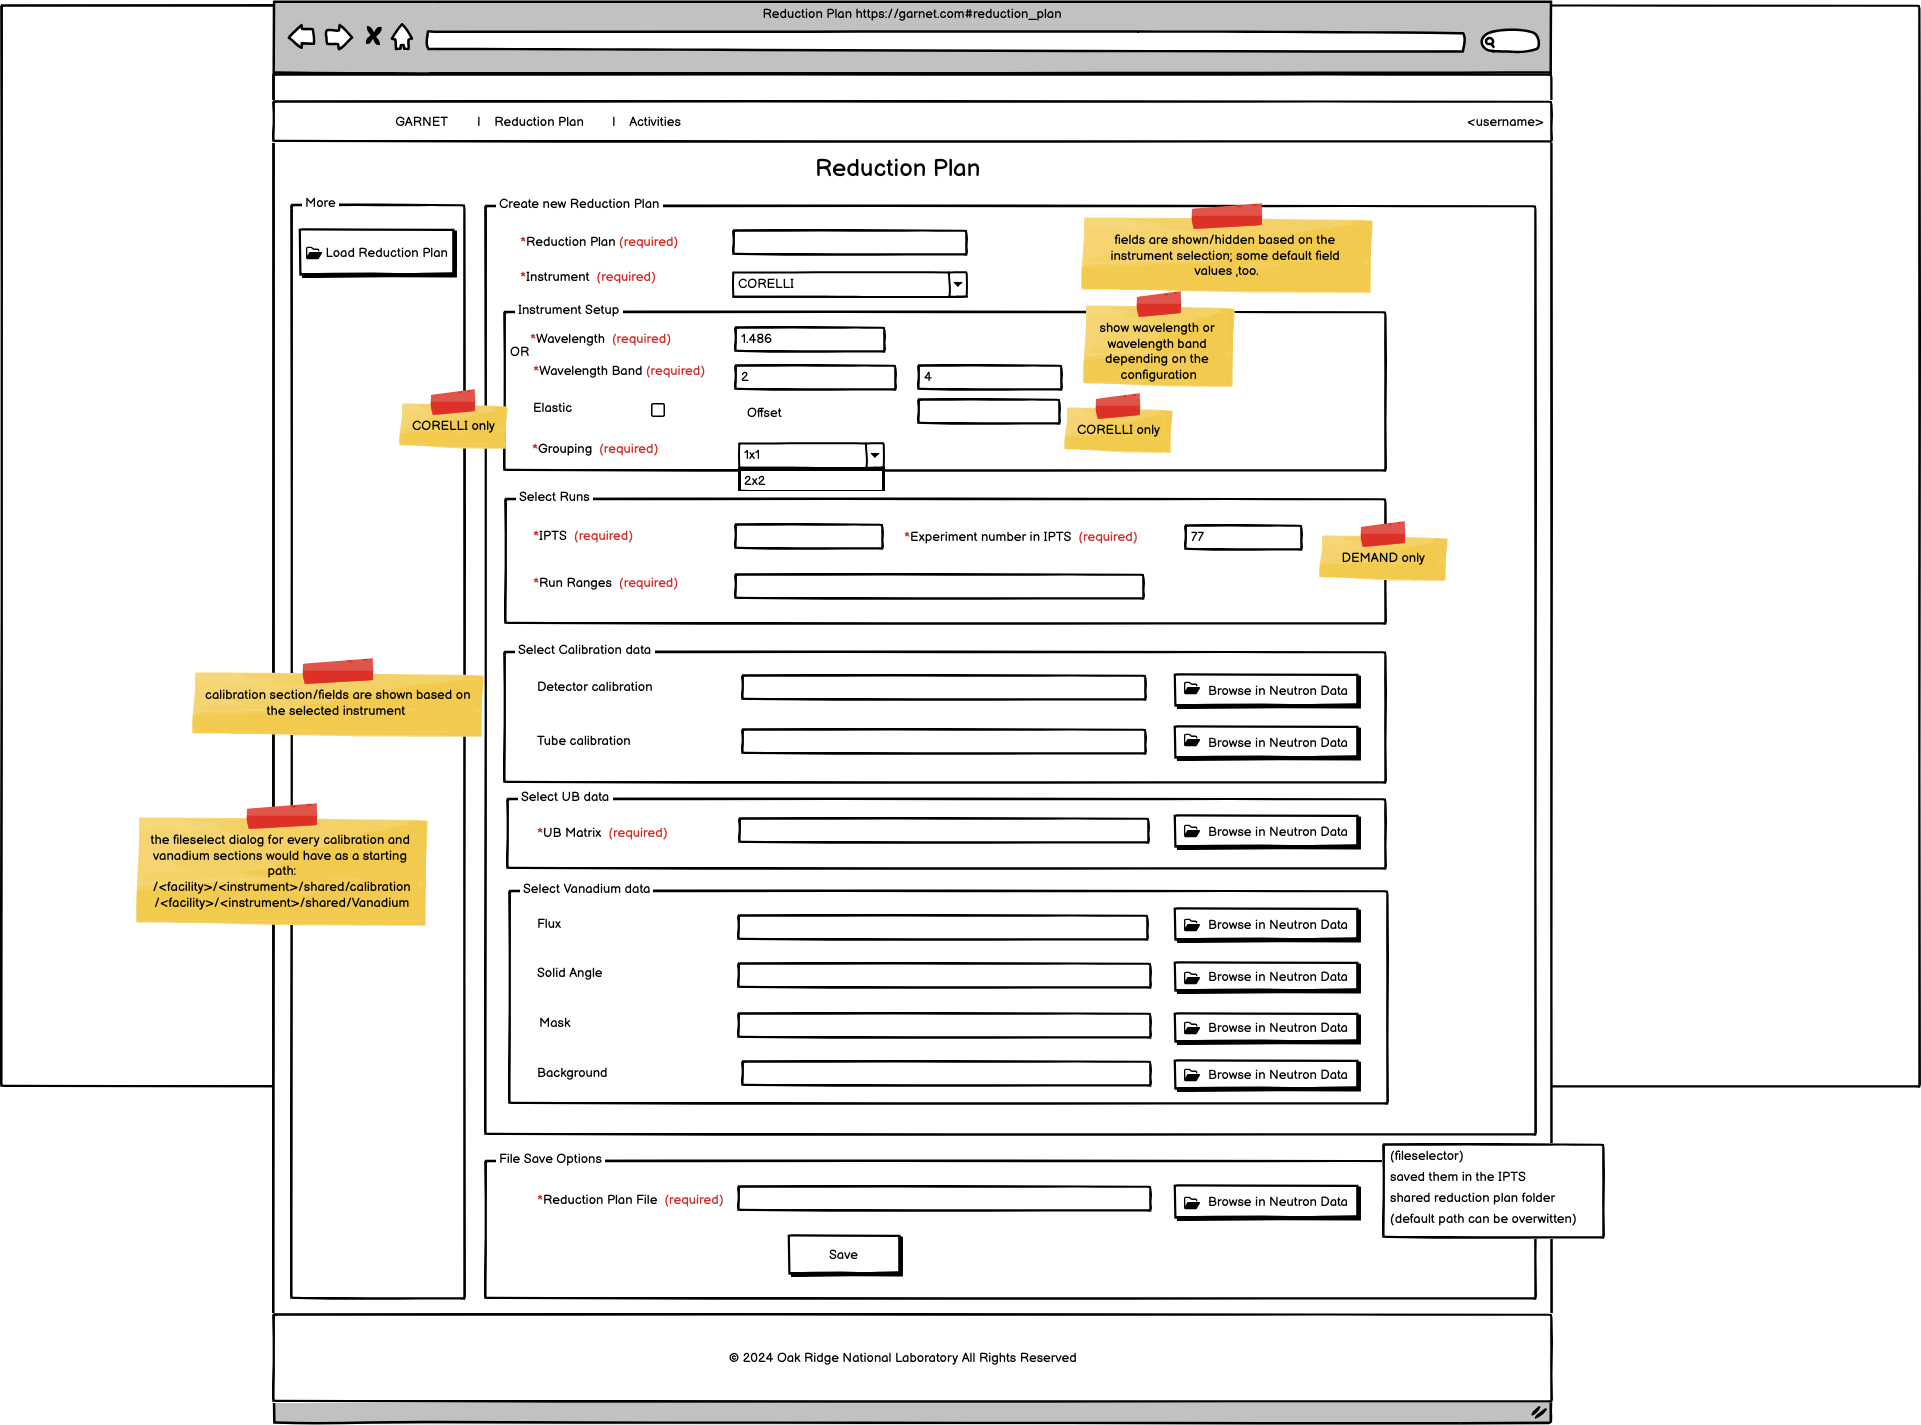
Validations occured as described above. An additional (backend) validation rule here, is to check whether the user selects an exisiting (reduction plan) instead of a new one. A warning message appears whether they would like to continue or not.
After a successfull form submission (Save button) a new ReductionPlan is created and the view is switched to Edit mode (Reduction Plan Edit page) for the newly-created reduction plan. A success status message appears: “Reduction <reduction_plan> has been created sucessfully.” below the Save button.
Edit
The user can land here from the Home Page by selecting a recent reduction plan or through the Reduction Plan button from Normalization and Integration Pages. The reduction plan parameters are shown and populated. The associated wireframe is displayed here: Wireframe Reduction Plan Edit. Regarding the instrument-specific fields, only the ones associated to the reduction plan’s instrument are displayed with their values. The rest stay hidden. Also, the filepath of the Reduction Plan cannot be modified (read-only).
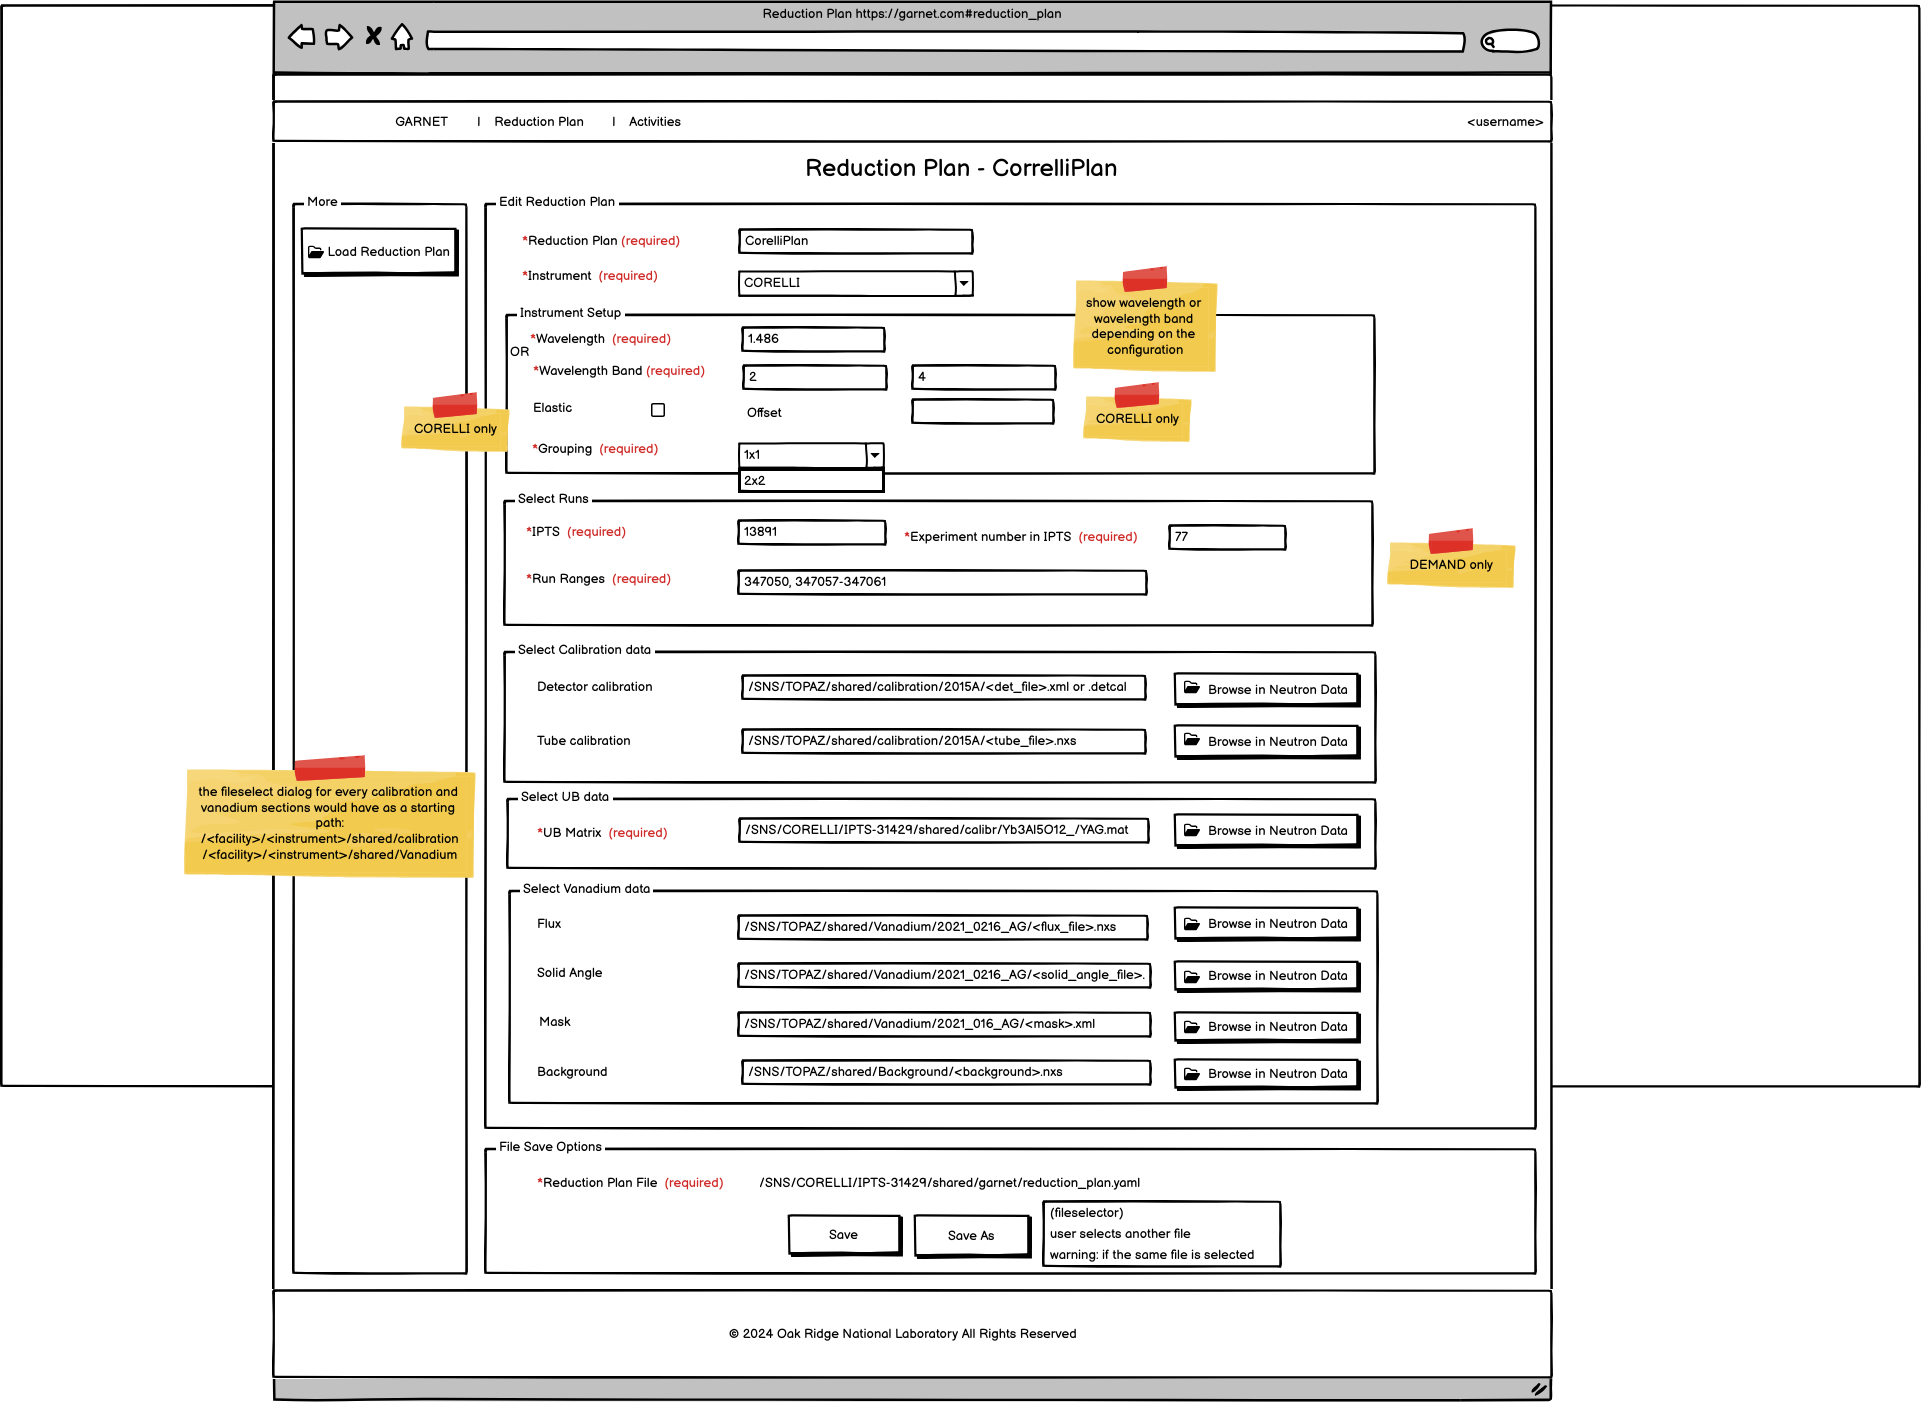
After a successfull form submission for Save button the ReductionPlan is updated and the view stays in Edit mode. A success status message appears: “Reduction <reduction_plan> has been updated sucessfully.” below the Save button.
After a successfull form submission for Save As button the new ReductionPlan is created, the read-only reduction plan filepath is updated and the view stays in Edit mode. A success status message appears: “Reduction <reduction_plan> has been updated sucessfully.” below the Save As button.
Load Reduction Plan - Browse in Neutron Data
In order to load a Reduction Plan file, the users click the associated Browse in Neutron Data button from the Home Page or the Load Reduction Plan from the Reduction Plan page. The filebrowser appears and users select a file from the (remote) filesystem. The parameters are read from the file and validated with the above validation rules.
In case the validation is successfull, a new ReductionPlan object is created in memory, the parameters are populated in the Reduction Plan Form and the view is switched to Edit mode (Reduction Plan Edit page). In case the validation is not succefful, the reduction plan is not created for the following invalid scenarios:
Invalid parameter values. An information message is displayed to the user: “The reduction plan was not saved. Please correct the issue and save it.”. The parameters are populated in the form with their validation messages/colors and the view is switched to Create mode.
Missing parameter fields (keys). An error message is displayed to the user: “The reduction plan was not loaded. Corrupted file schema.” . No change occurs after that.
Load the same file as the existing ReductionPlan’s file. An error message is displayed to the user: “The reduction plan was not loaded. File is already used in the current Reduction Plan.” . No change occurs after that.