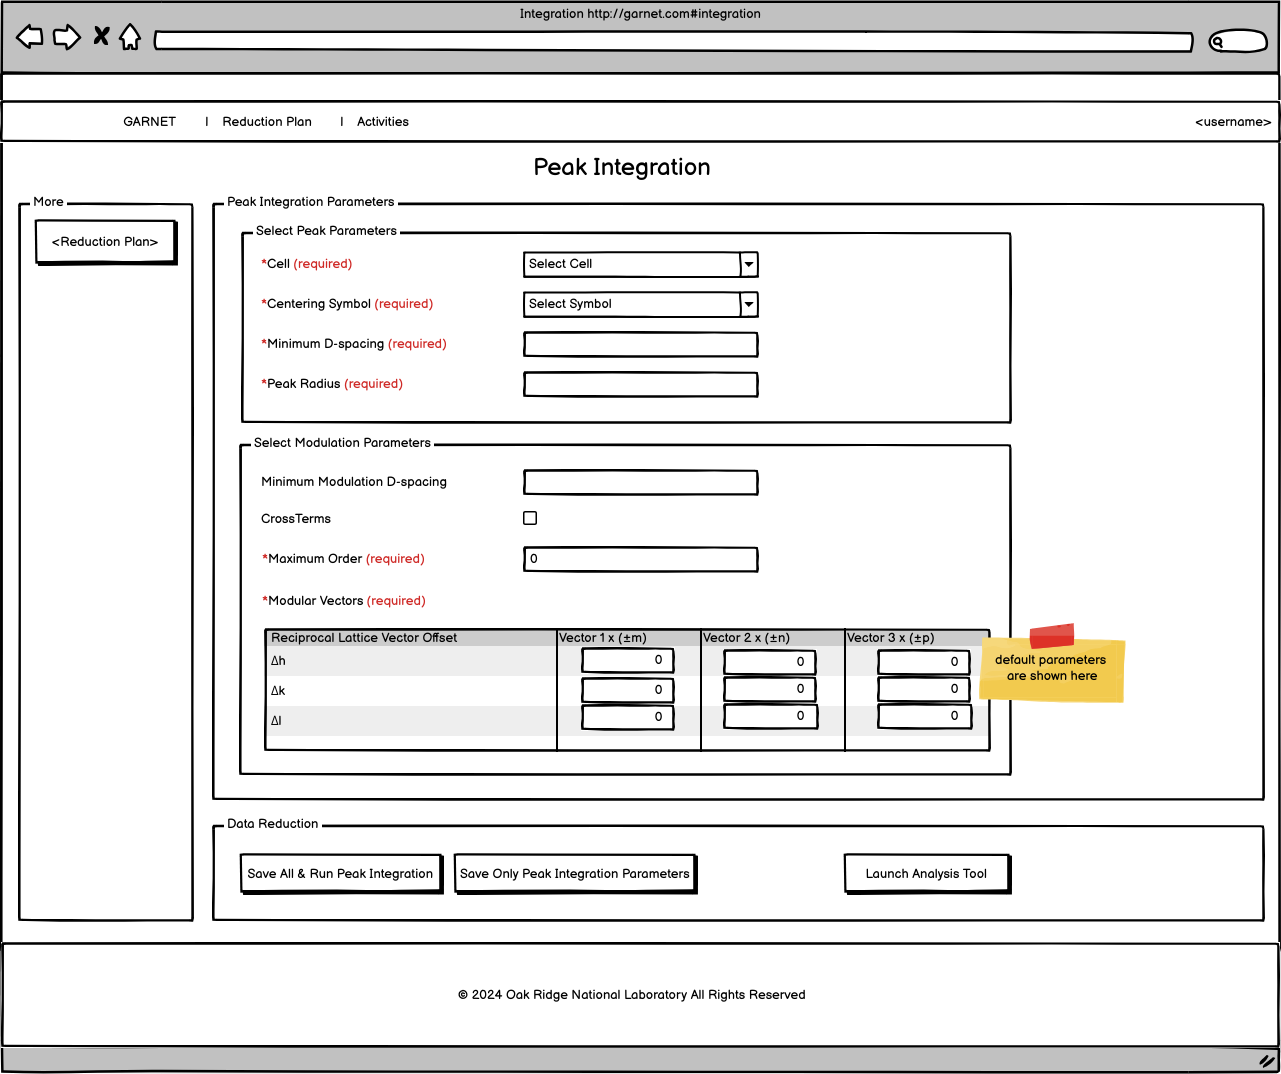
NDIP - Peak Integration
In this page, users can perform Peak Integration, by using the current Reduction Plan and the additional parameters defined here.
- Overall, users can:
create Peak Integration parameters in a Reduction Plan
edit the Peak Integration parameters of a Reduction plan from the ReductionPlan object or file (memory or disk)
run the Peak Integration data reduction process
launch an external tool for analyzing the data further
Fields
Below are the fields for peak integration
Field |
Type |
Value Origin |
Additional validation |
Mandatory |
|---|---|---|---|---|
Cell |
String |
predefined options from backend |
yes |
|
Centering Symbol |
String |
predefined options from backend |
yes |
|
Minimum D-Spacing |
Float |
>0 |
yes |
|
Peak Radius |
Float |
>0 and <1 |
yes |
|
Minimum Modulation D-Spacing |
Float |
>=Minimum D-Spacing |
no |
|
Maximum Order |
Integer |
default: 0 |
>=0 and <10 |
yes |
Modular Vectors X3 |
(Float, Float, Float) |
default mod_vectors[]: [[0,0,0],[0,0,0],[0,0,0]] |
non co-linear |
yes |
CrossTerms |
Boolean |
default: false |
yes |
- Cell options from configuration settings in the backend:
Monoclinic
Triclinic
Orthorhombic
Tetragonal
Rhombohedral
Hexagonal
Cubic
- Centering options from configuration settings in the backend:
P
I
F
R(obv)
R(rev)
A
B
C
Inter-Field Validations
The following field validations that involve pairs of fields are checked from the client side.
- MaxOrder-CrossTerms Combined Validation. If any of the fields change their inter-field validation rules should be checked. Invalid case:
CrossTerms = True and MaxOrder=0
In the invalid case, both MaxOrder and CrossTerms border colors become (invalid) red.
- MaxOrder-ModVectors Combined Validation. If any of the fields change their inter-field validation rules should be checked. Invalid cases:
ModVectors[0][0] = ModVectors[0][1] = .. = ModVectors[2][2] = 0 and MaxOrder !=0
at least 1 ModVectors[i][j] != 0 and MaxOrder =0
In the invalid cases, both MaxOrder and ModVectors table border colors become (invalid) red.
Validation
Regarding validation, same rules about styling, form submission, success/error mesages, client side vs. server side validation and messages apply here, as the Reduction Plan.
- Client side validation can include:
required fields
field types
minimum d-spacing limits
minimum modulation d-spacing limits
peak radius limits
maximum order limits
Additionally, when the user does not have a Reduction Plan, yet, and they land on this page, an error message (”Please create a Reduction Plan first”) below the submission buttons should appear. The buttons’ functionalities (Save All & Run Peak Integration, Save Only Peak Integration Parameters) are deactivated as the rest client side validations. The menu item on the left should be replaced to “Create Reduction Plan”. Launch tool button is visible and active anytime.
- Server side validation can include:
filepath/directory for peak integration data
peak integration exception
modvectors non colinear
Submission
Save All & Run Peak Integration button: When the user clicks the button, garnet runs the peak integration process and produces results. Both ReductionPlan object and file are updated with the peak integration parameters and Results filepaths. The Results block is updated with the generated files and their root directory. A success message (n=5s) is displayed: “Reduction Plan is updated with the Peak Integration Parameters and Results.”
Save Only Peak Integration Parameters button: When the user clicks the button, the peak integration parameters (cell unit parameters, modulation and results=[]) are saved in the ReductionPlan object and corresponding file. A success message (n=5s) is displayed: “Reduction Plan is updated with the Peak Integration Parameters.” below the button. The Results block becomes empty.
Launch Analysis tool button. When the user clicks this button, a new page appears with the analysis tool. This is a new tool. Requirement for this: TBD.
If the user runs peak integration and there is an existing directory/filenames, a warning message appears asking the user: “The current files in the directory <directory> will be overwritten. Do you want to continue?” (option to not show this message again). If the user selects to continue the files will be overwritten, else nothing will happen.
Create Peak Integration Parameters
The first time the user lands in the page with a Reduction Plan created/loaded in memory and no peak integration parameters exist in the plan, default parameters are displayed as shown here: Wireframe Peak Integration Landing.
Edit Peak Integration Parameters
If the existing Reduction Plan contains valid Peak Integration parameters, then they are shown in the web form over the default values. They are accesed from the ReductionPlan object first and then from the Reduction Plan file. The Results block with the directory and files should appear, too (Wireframe Peak Integration Edit).
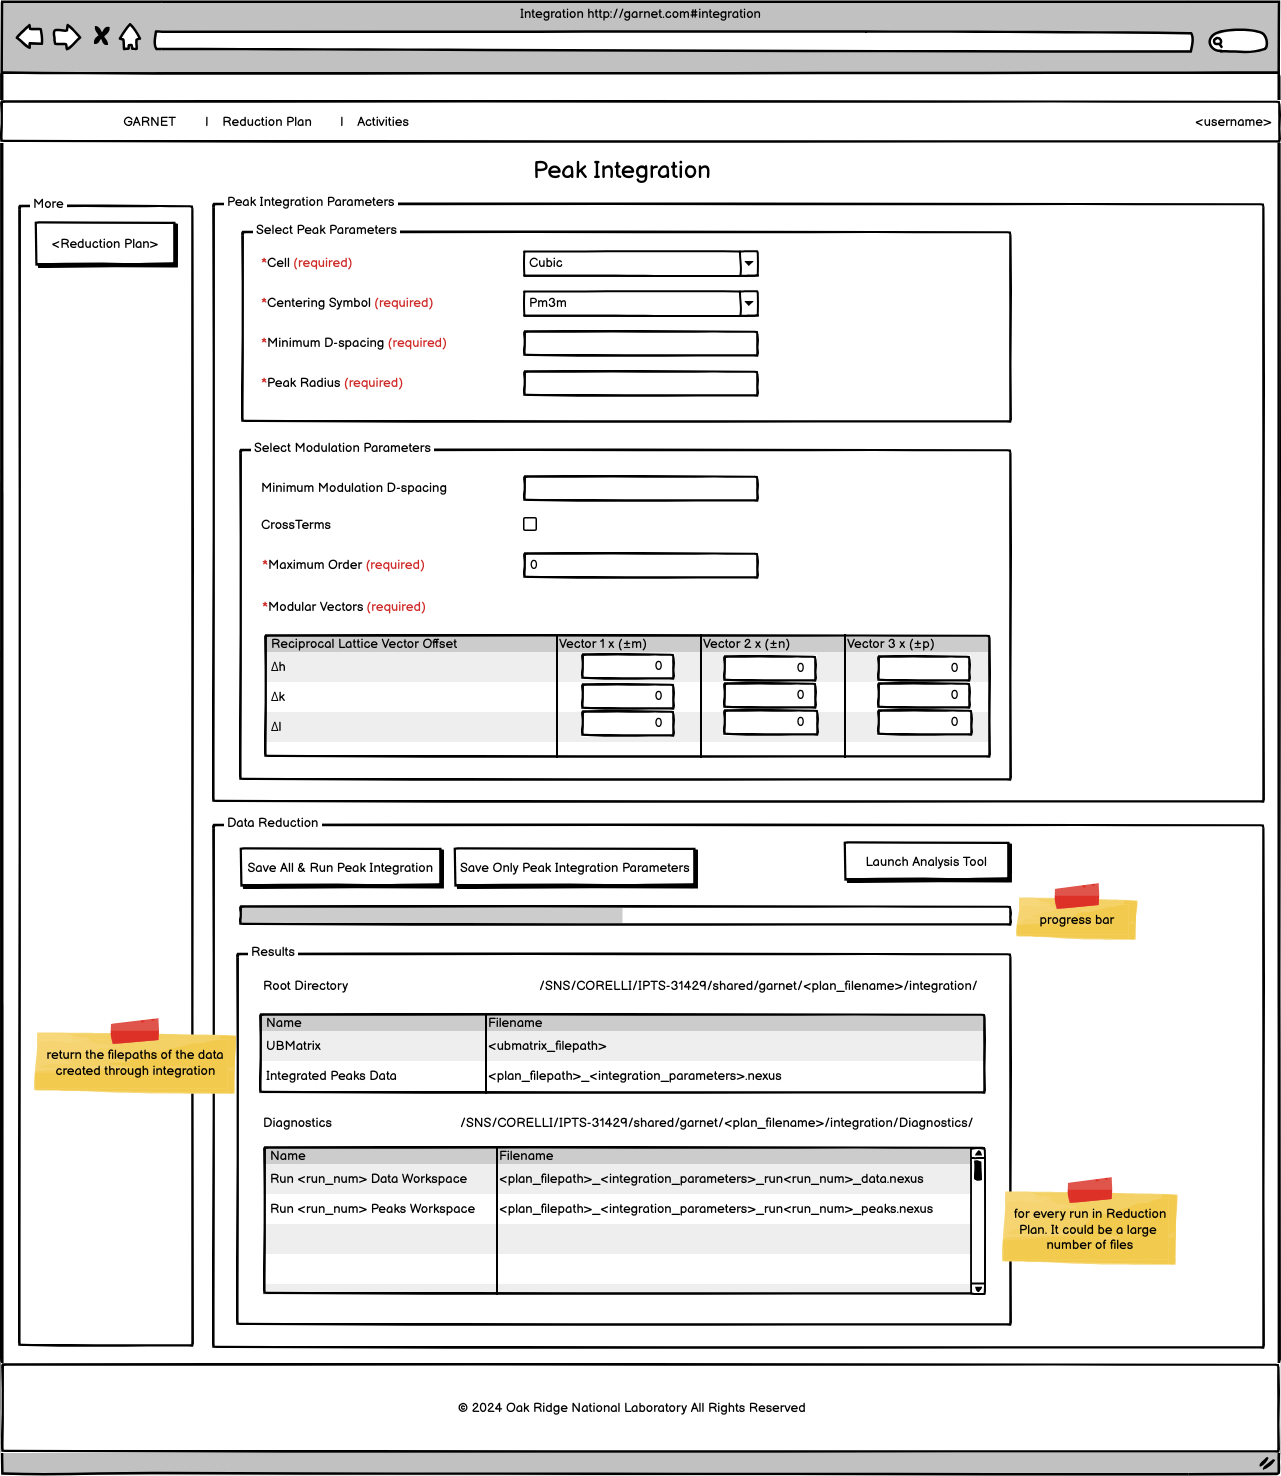
- If the fields are not valid:
Invalid parameter values. An information message is displayed to the user: “The peak integration parameters have some mistakes in the Reduction Plan. Please correct the issue and save it.”. The parameters are populated in the form with their validation messages/colors.
Missing parameter fields (keys). An error message is displayed to the user: “The peak integration parameters were not loaded. Please fill them in.” . The default peak integration parameters values should appear in this case.
If the Results exist, they should be populated, too.